3D MODELING PROJECT 2/FINAL PROJECT
07|06|2021(week 11-week 14)
Ating Melvin Otobong Abang(0333700)
Ating Melvin Otobong Abang(0333700)
3D Modeling
Project-2/Final Project
INSTRUCTION
PROJECT-2
07/06/2021|Week 11
For this project, we are required to create a character based on our own idea. This project will focus on organic (curves and smooth surface) mesh building with the understanding of anatomy, muscle, and
proper mesh/topology flow implementation catering for rig setups and UVW Layouts for texturing. E.g. models ± humans, monsters, vegetation, etc.
We needed to submit our references, mood board showing our ideas in Google Classroom.
As for me, I planned on doing a Ninja Pikachu which is inspired by a bit of Naruto here is my Moodboard below.
Fig 1.0 Moodboard
Lecturer's Feedback: start modeling looks good to go.
14/06/2021|Week 12
After received the go-head from my lecturer i started to model in Z brush starting with the normal sphere.
Fig 1.1 Sphere
from there I slowly progressed to getting the basic form of Pikachu's head here are the different views below.
Fig 1.5 Pikachu head side(right) front view
21/06/2021|Week 13
After managing model the head I moved on to the next phase of my model which was the full body of Pikachu I call it the base model.
Fig 1.6 Full body Pikachu(base model)
Lecturer's Feedback: Looks Good so far, for the rest you can poly-paint the rest of the details and accessories when you're done.
278/06/2021|Week 14
This week i moved unto the poly painting of the details and accessories and finally rendering it and making my A4 poster of the model in Photoshop.
i chose to poly paint the model as anytime i kept trying to bake my UV maps my Z brush kept crashing so i ask my lecturer and he said i could poly paint my model.
Fig 1.9 Front view(mask)
I had started adding accessories like a ninja mask to cover his mouth.
Fig 2.0 Back view(Mask)
Fig 2.1 Side(left) View
I had finished modeling accessories being a shirt, a mask and an eye patch to cover his eyes and i also added red eyes(pupils, using the clay and clay build-up brush.
Fig 2.2 Rendering model
Fig 2.3 First Outcome
Lecturer's Feedback: It's too dark try to reposition the direction of your light, add some light to the left of the model it's too dark.
So i then redid the render and added light to the left side and other areas as well.
Fig 2.4 Second Outcome
Fig 2.5 Third Outcome
FINAL OUTCOME
Fig 2.6 Front view
Fig 2.7 Back view
Fig 2.8 Side(left)view
Fig 2.9 Side(right)view
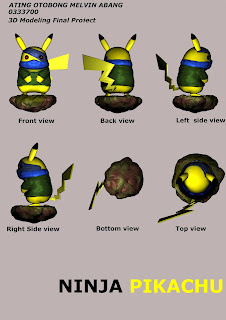
We were required to make a poster of each side of the model for the submission i designed mine using photoshop, here is my A4 poster below.
Fig 3.0 Poster
REFLECTION
This project has been a wild ride for me as we all were rushing for the final week, both having other final projects from other modules to complete also, we had to combine both project 2 and the final project into one, overall my experience doing them wasn't easy and i feel i could have done better if given more time.
But I'm proud of the final outcome I'd like to thank my lecturer for helping me throughout the stages where i was confused, Zbrush is hard to get a grasp of it but also needs patience which resulted in me watching a lot of youtube for help.


Comments
Post a Comment